Mating:
People
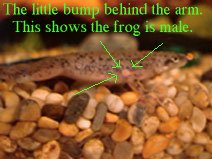
get very confused when trying to sex their frogs.
The main, and only
way to tell them apart is this: Males
have whitish bumps,
or pimples, behind their forearms.
Females do not.
If a female is gravid (full of eggs),
she will be extremely
round, shockingly so. This only
happens to older,
fertile females. When in a petshop
searching for males
and females, just look for the dots.
Young females will
not yet have rounded forms.
Getting your frogs ready to mate is no big deal.
All you need is
a pair. I have 2 females and 4 males
in a 5 gallon tank.
The water should be conditioned,
as always, with
StressCoat or any other dechlorinator.
You don't need a
plant, but if you have plants then the
eggs might stick
to them, making it easier to transfer
the eggs to another
tank when they do mate. I use a
single banana plant
which floats and produces long,
lovely lily-pad
like leaves.
Java moss is also good, but grows very very fast. It
provides algae,
which provides infusoria, which is
what the tads eat
in the first week of life.
This is good to
have around to put into the
tank that you will
transfer the eggs into.
Once the frogs are in breeding mode/mood the
male will start
singing, mostly at night. His
forearm bumps will
become more pronounced.
A male will then
clasp the female (and many
times they will
clasp another male. Sometimes
male frogs make
a crazy 'train' by clasping
others who clasp)
and if she wants to, she will
begin swimming in
circles until she deposits her eggs
on the surface of
the water. She will do this in
many increments,depositing approximately 20
or
more at a time. NOTE: a female may not
always
do this correctly.
Sometimes
she may need practice,
as mine did, depositing
eggs while in the wrong position,
leaving them unfertilized.
Unfertilized eggs come out
milky-white and
will not hatch. It is difficult at
first to determine
which are fertilized and which
are not. However,
this is what you need to do
once you see the
eggs:
1) Remove eggs with a simple soup ladel and put
into dechlorinized
(Stresscoat) water. In about 24
hours you should
see some or most of the eggs
changing shape,
elongating into worm-like forms.
If you look at these
with a magnifying glass you
may see them move.
Once these hatch they will
fall to the bottom
of the container, looking like
fallen 'commas'.
They will not yet move but
they are indeed
alive! Within a day you will
see them start to
move and eventually rise to
the top. You
may not notice this but they
are upside down
at this point, grazing the
surface of the water.
2)
Once hatched (2 days approx) add Liquifry
for Infusoria (get
an infusoria kit from a
biological supply
store, but not necessary),
algae from another
tank, or java moss.
Keep tads warm by
using a light. Keeping them
under a lamp during
the day is adequate.
3) Feed drop of Liquifry daily until tads are about 4-5
days old and swimming
upright, not upside down.
4) On day #4 you need to hatch brine shrimp to
feed the babies.
This takes 24 hours.
Don't panic;
this is easy but you have to
do it correctly.
Buy a small container of brine
shrimp eggs from
any petshop. It's cheap and
lasts a long time.
You also need aquarium salt
and an air pump
with and airline. The directions
for hatching the shrimp are
on the packet. The
shrimp last only
48 hours so you will have to
have a continuous
supply It's very important
to note that you
cannot feed adult brine shrimp,
just the tiniest
newly-hatched.
4) After about 4 days the tads will swim normally.
Take the airation
tube out of the brine-shrimp
hatching container
and let the whole thing settle
for about 10 minutes.
The brown egg shells will
rise to the top
while the shrimp will swim below.
Use an eyedropper
or suction out she shrimp from
the bottom of the
container into a little cup.
Feed the babies
a few eyedroppers of the shrimps.
You can see if how
many you've captured by holding
the eyedropper under
a light. You will be adding
a bit of salty water
to your tad water but this is ok.
5) You might lose many tads this is unavoidable, but
always change 1/2
water and put in fresh dechlorinated
water to keep it
clean...very very important. If some die,
then move the living
tads and some of the water into any
kind of clean container
while you dump the dead matter
and refresh the
main tad container. Then return the
babies to their
main container. While feeding the shrimp
the water can become
dirty as it is unavoidable that some
of the eggshells
go into the container along with the shrimp.
Once the tads begin feeding on the shrimp you will notice
their bellies becoming
round and brown in color. This is
a great sign.
If you don't notice this, then feed them
more brine shrimp.
You cannot really over-feed at this
point, but if you
do, then be careful about water cleanliness.
You may have to
feed your tads more than once a day.
You want to keep
their bellies full like this all the time.
6) In just a matter of days you will see them become
real tadpoles.
They will be visible clearly without the
use of a magnifying
glass and you will be able to see
eyes. When
the guys become about half and inch
long you will be
able to see legbuds developing by the
base of the tail.
Sometimes you might miss these buds
but all of a sudden
there will be little legs protruding.
Keep feeding shrimp
throughout this stage. Very soon
arms will emerge.
This is a very exciting stage.
7) Once the arms are out and the legs are showing a
knee-joint, you
might be able to graduat your tads to
real frog food.
Use blackworms because these worms
do not mess up the
water. Actually take just a couple
of live worms and
put them in the palm of your hand.
Use a butter knife
to slice them (it's not gross and they
still wiggle) into
very tiny pieces and introduce them to
the pollywog.
It's a thrill when they first eat these
critters!
When the frogs get bigger, which at this point
happens daily, you
can give them single worms and see if
they consume them.
You may also use frozen bloodworms.
Drop a single cube
into a cup of warm water. When it
dissolves, use a
tweezer to get just a bit of it and throw
it into the tad
container. If they eat it, then you have
another alternative
to the live food.
At this stage the tail absorbs within days. However,
you will be lucky
to come out with only a single frog
from a batch of
50 eggs. This is just nature's way.
If your breeding
frogs keep producing eggs, you may
include only
eggs that have been produce within the
same week in the
same tank. Otherwise, the size
difference will
not work. You may end up with a couple
of different containers
for different groups of spawn.